Budget Cooking...Comfort & Gourmet!

Pages

Showing posts with label sugar. Show all posts

Tuesday, June 22, 2010

Blueberry Muffins


I am excited to share this recipe for blueberry muffins with you.
It is easier than you may think to make these from scratch.
The cost of just one fresh bakery muffin is about the same as it is to make a dozen at home. Provided of course, you score with some low priced blueberries like I did this week. $1.49/pint Ka-CHING! I recommend refrigerating or freezing the leftover muffins.


Sift together dry ingredients into a large bowl.


Sea Salt and Baking Powder


Mix dry ingredients further with whisk.


Add oil, beaten eggs, rice milk, and water.


Mix well.


Gently fold in the blueberries.


I used 2 scoops for each muffin liner. Results = 12 Muffins.


INGREDIENTS

1 cup Fresh Blueberries (sorted and washed)
1 1/4 cup Unbleached Flour (reserve 1 tbsp)
2 tsp Baking Powder
1/2 tsp sea salt
3/4 cup Corn Meal
1 cup Sugar (reserve 1 tbsp)
1/4 cup oil (canola)
2 Eggs well beaten
1/2 cup rice milk
1/2 cup Water

DIRECTIONS

1. Preheat oven to 400 degrees Farenheit.

2. Sort and wash blueberries. Set Aside
3. Separate 1 tbsp of flour and 1 tbsp of sugar in a container with a lid.
Set aside.
4. Sift together remaining flour, salt, baking powder, cornmeal, and sugar into a large bowl.
5. Add oil, beaten eggs, rice milk and water. Mix well.
6. Place blueberries into container of flour and sugar mixture. Add lid. Shake, covering berries. This will prevent the berries from sinking to the bottom of the muffins.
7. Shake berries & any residual flour/sugar mixture into the batter. Gently fold the berries into the batter.
8. Using a large stainless steel scoop, add batter to cupcake liners.
9. Place muffin tin in center of oven. Bake for 17 minutes (I used convection setting), or until center is done.
10. Cool Muffins on a cooling rack. Serve warm with hot butter (I used best life buttery spread YUM!)

Enjoy!

Thursday, May 20, 2010

Homemade Pizza Dough


I love to use my custom blend of Unbleached and Whole Wheat Flour. I've tried using just whole wheat flour and the dough was way too sticky. The result was too dense and more rustic than I intended. I love the ease of allowing my bread maker to knead and proof my dough.


Add Water to Bread Pan


Add Salt and Olive Oil


Add Flour


Make a Small Well in the Center of the Flour


Add Sugar


Add Yeast


Things Should Be Looking Like This


After Pizza Dough Cycle is Complete, I Allow the Dough to Rise for an Additional Hour


Empty the Dough Onto A Floured Surface or Silicone Mat


Divide the Dough into Three Portions


Transfer Dough to Cornmeal Coated Baking Stone


If You Want a Thick Crust, Do not Prick the Dough.
For a thinner Crust, Prick it with a Fork.


INGREDIENTS

1 3/4 cups Warm Water
1 tsp Salt
3 tbsp Olive Oil
3 cups Unbleached Flour
1 1/4 cups Whole Wheat Flour
1 tsp Sugar, Honey or Agave Nectar
1 1/4 tsp Dry Yeast


DIRECTIONS

1. Add ingredients to automatic breadmaker pan in order.
This is important. The salt can kill the yeast. The sugar activates it.

2. Follow directions on your breadmaker for Pizza Dough.

3. Allow to Rise for an additional hour after the cycle is complete.

4. Turn out dough onto floured surface or silicone mat.

5. Divide dough into 3 separate sections.

6. Flour hands and press 1 of the dough rounds with fingers to spread it out into a
10 inch circle.

7. If desired, prick surface of the dough to prevent it from rising. Remembering, to leave a 1 inch boarder for the exterior crust. This makes a thinner crust. If you prefer a thicker crust. Do not prick it.

8. Dress with desired toppings. Cook and enjoy!


Monday, December 21, 2009

Creamy Frosting (CASEIN FREE- No Dairy)


I made this recipe as a substitute for cream cheese frosting.
It has zero dairy, whey or casein.

INGREDIENTS

1 Softened Stick of Soy Margarine or 1/2 cup butter flavor shortening
1 8oz Container Tofutti Better Than Cream Cheese (Softened)
2 Cups Sifted Powdered Sugar

DIRECTIONS

Using a Mixer, Cream the Margarine (or shortening) with the Tofutti BTCC,
Gradually add 2 Cups prepared sugar.


Cover & store in refrigerator.

Monday, October 12, 2009

Cherry Cheesecake (Dairy Free! NO CASEIN)


One of my children has a milk protein allergy.
I am always tweaking traditional recipes so that she will not feel left out.
Many family & friends requested I bring my cherry cheesecake to various gatherings over the years. I decided to recreate the recipe without the use of cream cheese, but using Tofutti Better Than Cream Cheese as a substitute.


Ingredients

One Oreo Chocolate Crumb Ready-Made Crust
Two 8oz containers Tofutti Better Than Cream Cheese
2/3 to 3/4 cups sugar
3 eggs
1 tsp vanilla extract
1 Can Cherry Pie Filling

Directions

Preheat oven to 350 degrees Fahrenheit.
Mix Cream Cheese Substitute with sugar, eggs & vanilla using hand mixer.
Pour into Ready Made Crust.
Bake in Oven for 40-50 minutes.
Let cool.
Top with Cherry Pie Filling
Refrigerate

Enjoy!
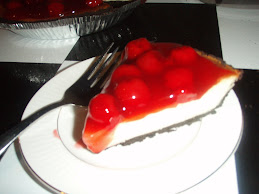


It has been my experience that using soy in baking results in a more dense result.
The texture & density will vary from that of traditional cheesecake.
If you want to make regular Cheesecake, swap out the tofutti for 2 8oz pks of cream cheese.


Check Out Toffuti Products